|
| Users say: |
|
With DvdRemake Pro I can now merge two DVDs and keep their original menus intact! This was one of the first things I found out about with DvdRemake Pro and it alone is worth the purchase price. To do this with other software, you would have to pay exorbitant amounts of money, and read a manual as thick as the one that came with your car. M.Z.
|
|
More...
|
|
|
Let’s take one of my favorite DVD’s - Terminator 3. Start DVD shrink, enter the Terminator 3 into your DVD reader, press the "Open Disc"
In the dropdown menu, choose your DVD, then press OK.
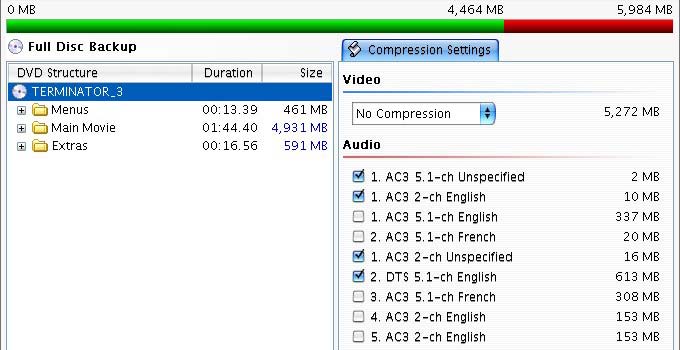
After few minutes in which DVD Shrink will read your DVD, you will be faced with the screen like the one below. On the right pane we see Video, Audio and subpicture. On the left pane we have DVD structure and a preview window.
Now we want to make sure everything is checked (In our case, check the "DTS 5.1-ch English" Audio).
We need to make sure DVD Shrink will not change the quality of our video (Transcoding is the last step, remember?) So we need to click on the "automatic" option in the video pane and change it into "No compression"
Now you see for the first time the real size of the movie on your DVD. 6958 MB - that’s big!

Let’s start with the subpicture. Now usually I never unclick anything there - it’s very small amount of data. But for the sake of the experience, let me remove Arabic by un-checking it…
On the right upper pane we have the most important choice to make - what audio should we save? Now here are some rules on what to backup:
- If you have a DTS enabled sound system backup only the DTS soundtrack. It’s the best audio quality, and it’s also the best way to check the stability of your walls and make your neighbors insane in the shortest possible time.
- Audio track entitled: "Unspecified" - leave them checked.
- The last Big-sized AC-3 2-ch audio tracks (see 4 & 5) are usually audio commentary. You don’t need that for a backup. If you do, well, you obviously have too much free time on your hands so please send me some!
- Leave the smaller AC-3 2-ch audio tracks. Those are usually come with the menus.
- Other languages you don’t speak - leave them aside. I prefer English but if you prefer your entire DVD’s to include only Spanish then please be my guest.
We are finished now. Look at the screen - notice the size (5984 MB - almost 1 Giga Byte had been removed)
Now we can save the content to the hard disc. Press the "Backup!" button. A warning message will appear stating your target is too big to fit on a disc. Press "Yes" to continue to the next step.
We are in the backup menu. Click the "Select target device" and from the pull down menu, choose "Hard Disc Folder"
Now it’s OK to start to decrypt the content you chose. Go have a break (Have a kit-kat)
When its finish close DVD Shrink. Congratulations - step one is over!

|

 Copyright ©2003-2019 DimadSoft. All rights reserved.